Auto Batching with Credit Card Module
Users can configure the Credit Card Module to automatically batch credit card transactions.
 How to Auto Batch Using Credit Card Module
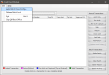
- Open the Credit Card Module from the system tray.
- Click the File menu.
- Select the Auto Batch Close Config option.
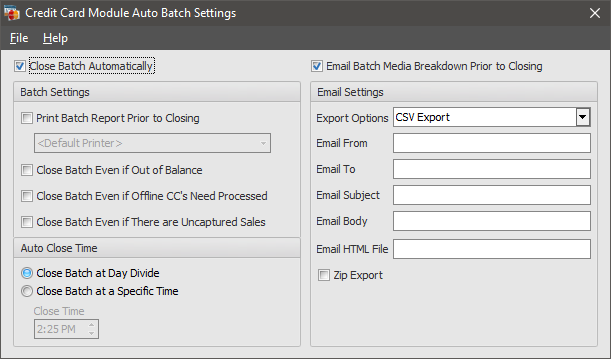
- When the Auto Batch Close Configuration window appears, configure the auto batch settings:
- Check the Close Batch Automatically check box to enable auto batching.
- Print Batch Report Prior to Closing prints the Batch Report prior to closing the batch. If the Batch Report fails to print, the auto batch will not close. Select a printer from the drop down.
- Close Batch Even if Out of Balance closes the batch even if FPOS and the host totals do not match.
- Close Batch Even if Offline CC's Need Processed begins auto batching even if there are pending offline sales.
- Close Batch Even if There are Uncaptured Sales closes the batch even if there are uncaptured sales, such as uncaptured pre authorizations, in the batch.
- Configure Auto Close Time options:
- Close Batch at Day Divide closes the batch at the Day Divide, as specified in System Settings > Settings 1.
- Close Batch at a Specific Time closes the batch at the time specified in the Close Time field.
- Check the Email Batch Media Breakdown Prior to Closing option to email the batch summary. Then, configure the Email Settings.
- Select an Export Option from the drop down.
- View Only Displays the report in the Report Preview screen.
- Print. Select Printer. Prompts the user to select a printer from the Print dialog.
- Print. Use Default Printer. Automatically prints the report using the default printer.
- CSV Export Saves the CSV file to the location specified in the Export File field. Enter a path in the Export File field.
- PDF Export Saves the PDF file to the location specified in the Export File field. Enter a path in the Export File field.
- HTML Export Saves the HTML file to the location specified in the Export File field. Enter a path in the Export File field.
- MHT Export Saves the MHT file to the location specified in the Export File field. Enter a path in the Export File field.
- RTF Export Saves the RTF file to the location specified in the Export File field. Enter a path in the Export File field.
- EXCEL Export Saves the Excel file to the location specified in the Export File field. Enter a path in the Export File field.
- Text Export Saves the Text file to the location specified in the Export File field. Enter a path in the Export File field.
- IMAGE Export Saves the Image file to the location specified in the Export File field. Enter a path in the Export File field.
- Enter the sender's email address in the Email From field.
- Enter the recipient's email address in the Email To field.
- Enter an Email Subject that clearly identifies the contents of the email.
- (Optional) Enter any text to be included in the Email Body.
- (Optional) Enter an Email HTML File path to a file containing HTML content, such as a logo, for use in the body of the email. If text is present in the Email Body field, the Email Body text will be displayed first, followed by the HTML file.
- Check the Zip Export option to have the file sent as a zipped attachment.
- After configuring the Auto Batch settings, click File > Save.
Open topic with navigation